SHARE
Tips To Edit Your iPhone Photos Like A Pro
Last month I shared my Tips for Taking Better Photos with your Phone, but did you know that you can also easily edit your photos on your iPhone? In fact, just a few tweaks can quickly transform your shots into ones you’ll be proud to post on Facebook and Instagram! Just follow these tips to edit your iPhone Photos like a pro.
To edit an image on your iPhone, first navigate to your Photos App. Then, select the image you want to edit. With your image open, tap on “Edit”, which is shown on the upper righthand corner of your phone (see example below).

Editing tools are located on the bottom of your phone. (Note: icons are arranged differently depending on which model iPhone you have.) Below is a guide to using some of the basic editing functions on the iPhone.
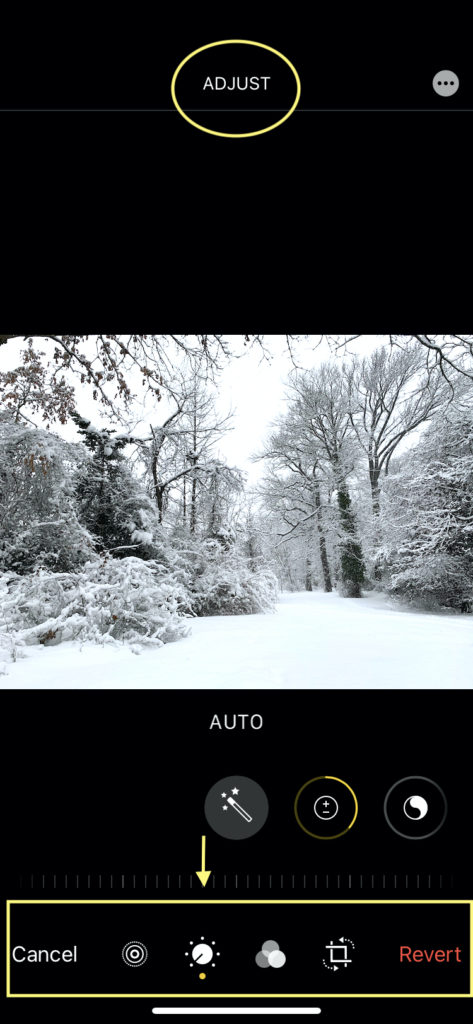
1. Brighten Your Image
Light (good exposure) is the most important aspect in a creating a good photo. Sometimes, simply brightening your photo can have a dramatic impact on how your photo looks on both your screen and in print. But when it comes to adjusting the lightness of your image, there are a few options to chose from. Adjusting exposure is one of them. I’ll cover other options below. First, make sure you’re in the Lighting editing section (dial with dots around it shown above).
Exposure (Light) Tool
When to Adjust Exposure
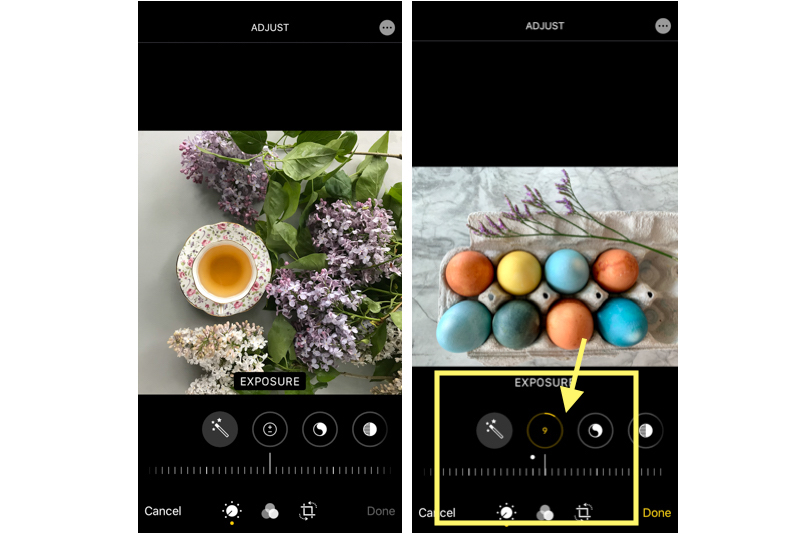
The exposure tool (the circle with the + and – symbol inside it) is great when you want to brighten everything in the photo. First, tap the exposure icon and then use the slider to make your adjustment. Sliding the notch to the right adds exposure (light) and sliding it to the left decreases light.
Often, when we rely on the camera to set exposure (rather than manually adjusting exposure before taking the shot), we end up with an image that is underexposed, and occasionally overexposed. If your photo looks dark and skin tones have a muddy appearance and lack detail, your image is likely underexposed. Photos that are washed out and lack detail in the highlights are overexposed. Use the exposure slider to correct these issues.
2. Crop For Better Composition
Cropping your image is a simple step for transforming your images from ordinary to artistic. Cropping can immediately draw the viewer’s eye to your subject.
The crop tool allows you to rotate, crop or straighten your image.
It’s generally best to try and compose your shot in camera rather than relying on cropping too much afterwards. But, sometimes we’re in such a hurry to capture the moment that we miss a good composition.
Why and When To Crop an Image
To eliminate background distractions
Eliminate objects that don’t add to your photo by cropping in on your subject. (Note: be careful not to crop in too tightly because this will degrade the quality of your image).
To improve composition
Try using the rule of thirds overlay with the crop tool to crop your image so that your subject falls along an intersecting point using the rule of thirds.
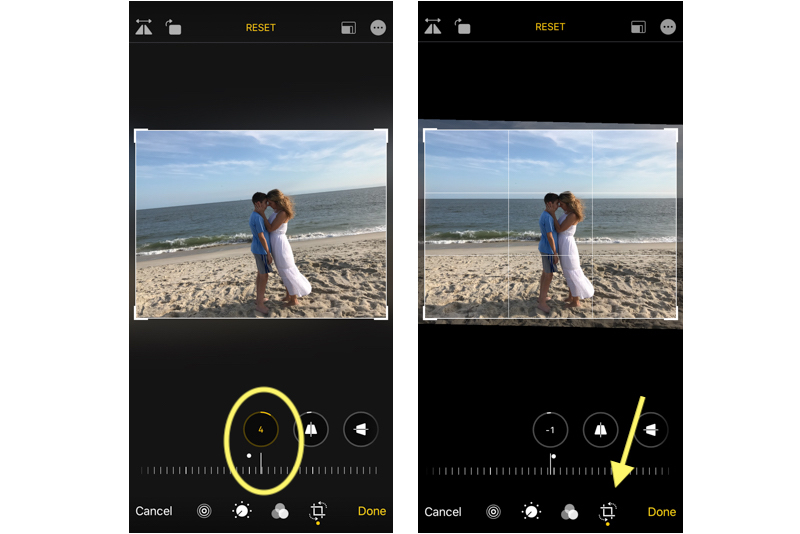
To straighten a crooked horizon
Straightening horizons is one of the first tips taught in any photography composition class. If you want to look like a pro, keep your horizons straight!
To change the aspect ratio
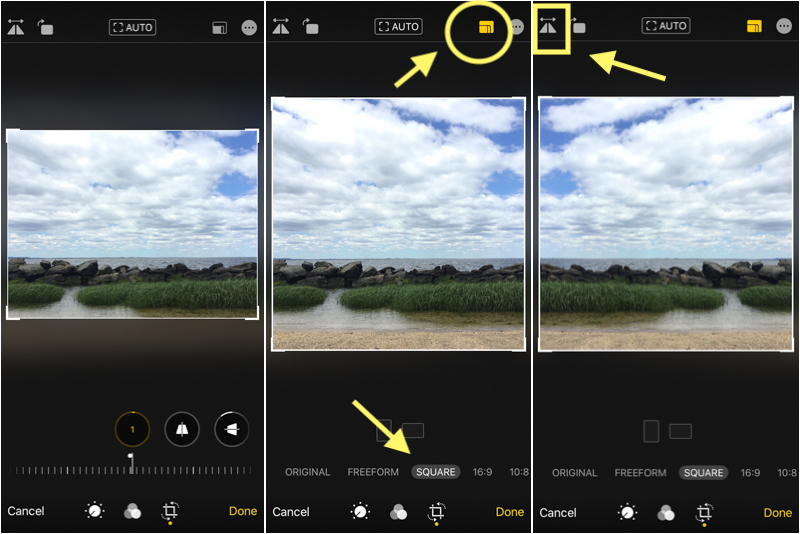
You can also change the aspect ratio of your image, if for example you want to resize your image as a square (1×1) for Instagram, or order a print in a size other than a 4×6 (3:2 aspect ratio).
Another handy feature on newer iPhones (e.g., XR models and up) is the ability to flip the orientation of the image. Sometimes changing the orientation can give your image more impact.
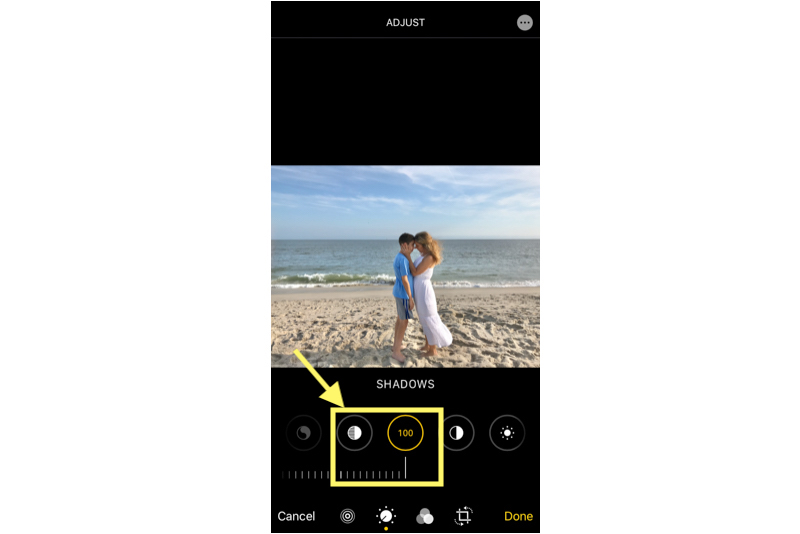
3. Adjust the Shadows
Use the shadows tool to bring out detail in the dark and bright areas of your photo and add impact to your image. This tool allows you to control how light or dark the shadow areas of your image are without affecting other parts of the image, such as the highlights.
Adjusting the shadows is a personal preference and can vary from image to image. Experiment with changes to this slider to see what you like.
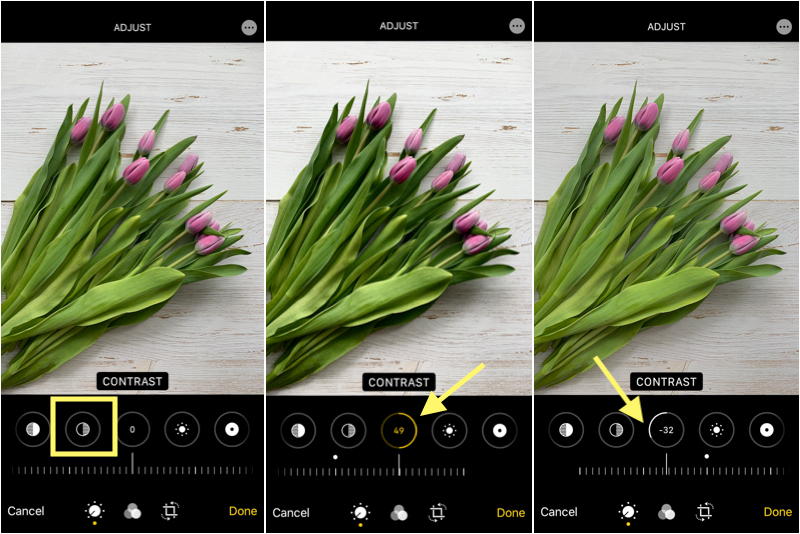
4. Create Contrast
Increasing contrast can add depth, detail and dimension to your images while decreasing it can give images a lighter and softer feel.
The contrast tool impacts the bright and dark areas of your image at the same time. Move the slider right to increase contrast, and make the shadows darker and the highlights brighter. Or drag left to reduce contrast, and make the shadows and highlights more similar in tone.
5. Fine-Tune the Color and Vibrance
There are a few options when it comes to adjusting the colors in your image.
Saturation and Brilliance Tools
These tools will either darken or lighten the colors in your image, but be careful because increasing saturation also affects skin tones along with all the other colors in your photo. This can lead to overly orange and red-looking skin. Instead of increasing saturation, try adjusting the black point slider, which will either darken or lighten colors without impacting skin.
Tweak the Blacks
My favorite method for making subtle and natural adjustments to color on my iPhone is the Black Point tool.
This slider adjusts the dark areas of the image. Sliding the adjustment to the left will darken black and other dark tones in your image, while sliding it to the right will lighten dark tones. This is a useful tool for adding depth to colors in your image (decreasing the black point) or to lightening colors in your image to give it a more bright and airy feel.
6. Adjust the Highlights
Decreasing the highlights will darken the light areas of your photo and reveal more of the highlight detail that was captured in your image. This can be useful if your photo was shot in bright sunlight and overexposed.
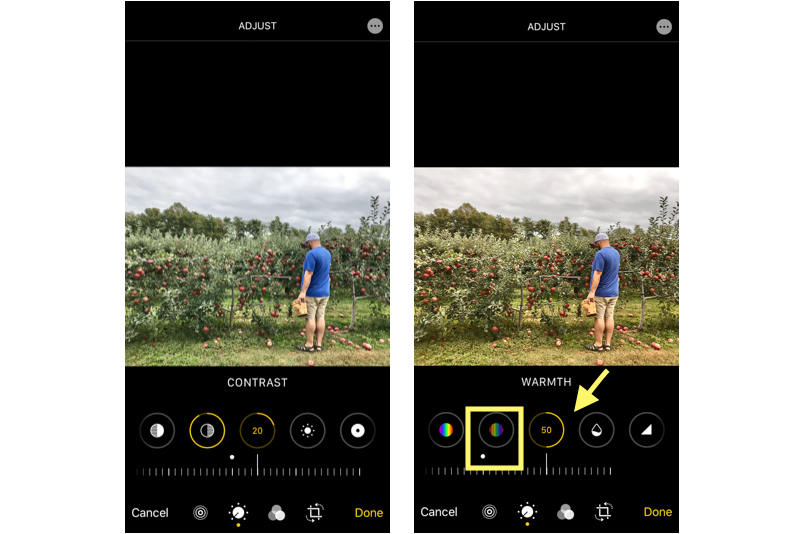
7. Add Warmth
Correct color casts by adjusting the white balance of your image.
While our eyes are able to compensate for different types of lighting (day light, sunset, incandescent or tungsten light for example), cameras often capture images that have an incorrect white balance or color cast (usually too cool or too warm, depending on the lighting conditions). To correct for images that are too cool, simply slide the warmth slider to the right. If your image is too warm, move the slider to the left.
Images that are too cool may appear blue and underexposed (dark). This is especially evident when looking at white in an image. Images that are too warm have an overly orange tint.
Tip: Adding a bit of warmth to an image with cool tones can also impact the brightness of your image.
8. Experiment with Filters

Filters can be a fun way to quickly try out different looks. Filters on the iPhone range from vivid to monochrome.
In general, I prefer to avoid using filters because I like to have more control over my edits and like images with a cleaner, more natural and classic look. But many people love filters. Experiment for yourself to see what you like.
Tip: When using the monochrome filter on your phone, making subtle adjustments to the shadows, blacks, contrast and sometimes exposure will give you a stronger black and white image than simply applying the filter alone.
I hope you found these tips helpful and would love to hear from you! Do you have a favorite editing tool that I didn’t cover? Let me know!
Looking for some More Tips for Taking Better Photos of your Kids and Family? Get my FREE PDF guide emailed to your mailbox. Enter your email here.
xo,


Leave a Reply Cancel reply
Thank You for signing up!
You'll be added to my newsletter list.
Please add my email address to your contacts to ensure you don't miss a thing!
Winner of the Westfield Area Most Loved Family Photographer award by Hulafrog two years in a row, Debbie Camba Photography is a New Jersey Family Photographer based in Scotch Plains. She specializes in capturing candid and meaningful moments that reflect the love and wonder of childhood and family life.
Debbie photographs families outdoors and in homes throughout Scotch Plains, Westfield, Mountainside, Cranford, Summit, Basking Ridge and the surrounding area, including Somerset County, Morris County and Middlesex County. She is available in other locations upon request.
Debbie was awarded Master Photographer Certifications by the National Association of Professional Child Photographers (NAPCP) for demonstrating excellence in the craft of child and family photography.
about debbie...
Heartfelt Images that Capture Your Family's Love, Laughter & Connections...
Copyright 2024 - Debbie Camba Photography | New Jersey Family Photographer | 908-858-2068
SAY HELLO!
A great article, I am a professional photo editor, using a desktop computer, but have always wanted to learn how to use my mobile to edit on the go.